Sample lists
Just like Note lists samples are organized into lists. The sample list system can be used to create sequences of samples or to rearrange slices of a sample into something new. Samples can be loaded from storage, the audio inputs can be sampled or the PolyPulse tracks and outputs can be resampled.
Several sound engines use samples for creating sounds:
Subtractive: samples layered with oscillators.
Resonator: samples as exciter for the resonators.
Quad engine: up to 4 sample parts.
Granular: samples as grains.
The PolyPulse comes with 26GB free storage space and 512MB RAM. In practice it can load about 10-15 minutes of stereo audio (or double that in mono) to be used in projects.
See also
For more info about supported file types and loading files see Projects and files.
Using sample lists
When samples are used in Subtractive, Resonator and Quad engine one sample is picked from the selected sample list per triggered note. When the next note is triggered, a new sample is picked from the sample list according to the note sel parameter of the pulse that triggered the note (see Note selection).
When samples are used in Granular grains are picked from the sample list based on brightness and loudness parameters.
To use a sample list in a sound engine set the samples parameter to the desired sample list.
Sample list editor
Sample lists are edited using the sample list editor which can be opened by pressing samples and closed by pressing shift+yes or by pressing samples again. When the sample list editor is opened it shows an overview of all sample lists. On the left you see the names of the sample lists and on the right is a preview of the contents of the highlighted sample list. Sample lists are identified by name and are sorted by their ASCII code: 0→9, A→Z and then a→z.

X scrolls through the lists.
yes opens the highlighted list so it can be edited.
edit opens a menu with additional functions (see Editing functions).
Instead of using X editing and navigation the numpad can also be used:
shift |
- |
- |
- |
files |
edit |
- |
- |
- |
samples |
no |
- |
prev_list |
- |
FX |
yes |
- |
next_list |
- |
settings |
pattern |
note_list |
cue |
morph |
clock |
Editing sample lists
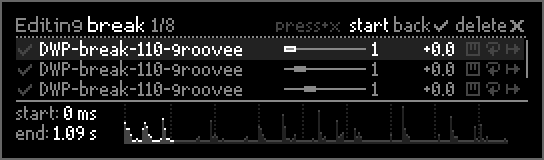
In the list editing view a single list is shown with the beginning of the list above and the ending of the list below. On the left is the selection check mark and the sample file name. To the right is a horizontal bar showing the start and end points, next to that the rate, then the dBFS value and finally three extra options: pitch tracking, looping and start from zero. In the bottom half of the screen is the waveform of currently highlighted sample and the exact start and end values.

X scrolls through the samples in the list.
Y changes the value that is blinking.
Pressing and turning X changes what value edited.
+ and - moves the highlighted sample up or down in the list.
shift selects the highlighted sample to apply Editing functions to.
edit opens a menu with additional functions (see Editing functions).
Each sample in a sample list has the following parameters shown to the right of the sample name:
start sets where a sample starts playing.
end sets where a sample stops playing (or if looping is enabled will jump back to start).
rate sets the base speed / pitch at which a samples plays.
dBFS can be used to adjust the individual loudness of samples in a list.
These values can be edited by pressing and turning X to select what value is edited, and turning Y to change the selected (blinking) value, similar to how notes are edited in the note list editor.
The following options can be set using the top row of black buttons on the numpad:
pitch tracking will adjust the speed / pitch of a sample to match the current note.
looping makes a sample loop from start to end for as long as the sound engines amplitude envelope is open.
start from zero will make the sample play from the beginning of the sample once and if looping is enabled continue looping from start to end.
Instead of using X and Y for editing and navigation the numpad can also be used:
shift |
pitch_tracking |
looping |
start_from_zero |
files |
edit |
- |
- |
- |
samples |
no |
decrease_value |
prev_sample |
increase_value |
FX |
yes |
prev_column |
next_sample |
next_column |
settings |
pattern |
note_list |
cue |
morph |
clock |
Tip
To quickly enable/disable pitch tracking, looping and/or start from zero for multiple samples hold down the corresponding button while scrolling through the list with X.
Pitch tracking
If pitch tracking is enabled the playback speed of a sample is adjusted to match the pitch of the current note. To do this correctly it needs to know the pitch of the sample. To make sure the correct reference pitch is automatically set add the following to the end of the filenames of pitched samples:
The base note: A, B, C, D, E, F or G (uppercase)
A flat or sharp: b or # (optional)
the octave: a number between 0 and 9
For example:
piano-D#4.wav
808-kick-A1.wav
If no pitch could be determined from the filename it is assumed the sample has a pitch of 440 Hz (A4). The reference pitch can also be manually changed after a sample is loaded: see Change reference pitch.
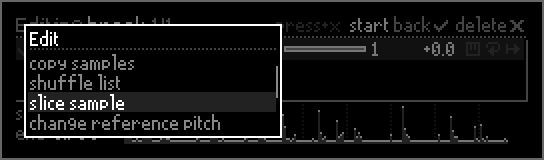
Editing functions
The sample list editor includes several handy editing functions that can be accessed by pressing edit.
Some functions can either be applied to the complete list or on a selection of the list. Sample are selected by pressing shift and multiple samples can be quickly selected by holding down shift while scrolling through the list with X. If no samples are selected, the function applies to the whole list.
Copy samples
Sample lists or selections of samples can be copied and inserted into any list at any position:
Open the list that you want to copy from.
(optional) Select a range of samples with shift.

Press edit to open the editing menu.
Scroll to copy samples and press yes.

Scroll to the list that you want to copy to and press yes to confirm.

Set the position at which the copied samples are inserted with X.

Press yes to confirm and copy the samples to the selection position.
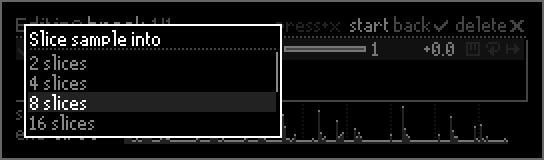
Slicing samples
The slice sample function duplicates a sample x times and adjusts the start and end times of each ‘slice’. After slicing the parameters of each slice can be changed and slices can be freely rearranged, removed or duplicated. To slice a sample:
(optional) Adjust the start and end times of the sample.
Press edit to open the editing menu.
Scroll to slice sample and press yes.
Select the amount of slices and press yes.
The sample will now be duplicated and the start and end times of each slice will be adjusted:
(optional) Adjust the start and end times of the slices.
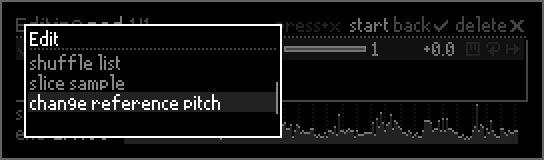
Change reference pitch
To change the reference pitch of a sample:
Press edit to open the editing menu.
Scroll to change reference pitch and press yes.
Enter the new reference pitch:
as note name optional with a cents offset:
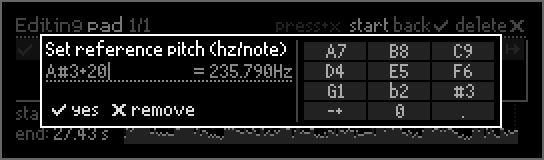
or as frequency in Hz:
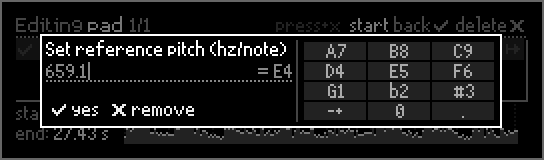
Press yes.
Note
Note that only the reference pitch of the currently highlighted sample is changed. If the same sample is used multiple times in a project each one has to be manually adjusted.
Recording audio
Audio can be (re)sampled from the following sources:
audio inputs 1-4 (mono), 1+2 or 3+4 (stereo)
tracks 1-5 (all active channels)
audio outputs (all active channels)
Recordings are automatically named and during recording the audio is directly written to storage to consume minimal RAM overhead. When recording one of the tracks or the outputs it automatically detects what channels are active and records those.
Note
While recording has little impact on CPU usage, it can lower the display frame rate in high CPU usage projects.
To start recording:
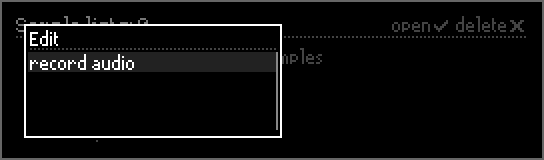
Press samples to open the sample list editor.
Press edit to open the editing menu.
Scroll to record audio and press yes.
Select the recording source.

Press yes to start recording. While recording is active an overlay is shown with a VU meter that flashes to when the signal (almost) clips.

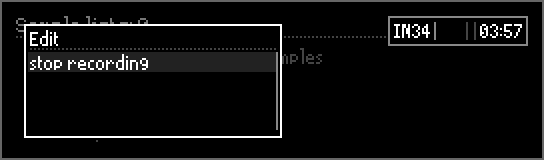
To stop recording:
Press samples to open the sample list editor.
Press edit to open the editing menu.
Scroll to stop recording and press yes.
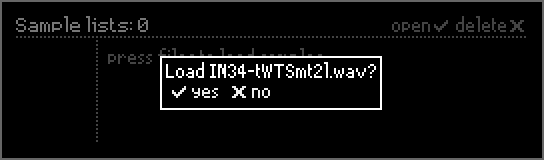
The recording is saved in the recordings folder. Press yes to directly load the recording or press no.