Poly pulse sequencer
The PolyPulse creates musical patterns and complex rhythms using an algorithmic sequencer controlled by parameters. In contrast to conventional sequencers, in the PolyPulse the rhythmic content and melodic content are not necessarily always linked. Rhythms are made using the poly pulse sequencer and melodies are created using Note lists. This system allows you to quickly create a variation on a groove by turning just a single knob, and allows you to make combinations between various rhythms and melodies. On this page we’ll dive deeper into the workings of a poly pulse sequencer.
The anatomy of a pulse
All sequencers derive their internal clocks from the main clock controlled by the BPM parameter. The main clock can be started and stopped by pressing clock. Once the main clock is running, the gray block below the CPU usage percentage starts moving from left to right to indicate the position within the current beat.

The poly pulse sequencer derives its grid from the main clock using the clock mult, which sets into how many sequencer ticks one beat is divided. On this grid of ticks we can create various rhythmical patterns using pulses.
Note
If clock mult is set to 8, then the grid is set to 32nd notes, because 1/4th note / 8 = 32nd notes.
Each pulse has the following parameters:
interval is the time in ticks from one note the next.
offset is used to shift the pulse forward or backward in time in relation to other pulses.
octave sets the octave at which this pulse plays notes.
reset is the number of ticks after which the pulse jumps back to zero. This can be used to introduce syncopation into a pulse.
note sel sets the method of assigning pitches to the sequenced notes. See Note lists.
rand time sets the range of how long each note is randomly delayed before it is triggered. Instead of a random delay a static delay can be set by pressing the encoder and using time.
swing sets the amount of swing applied to a pulse. This is affected by the swing ticks which can be found in the track settings (edit+track).
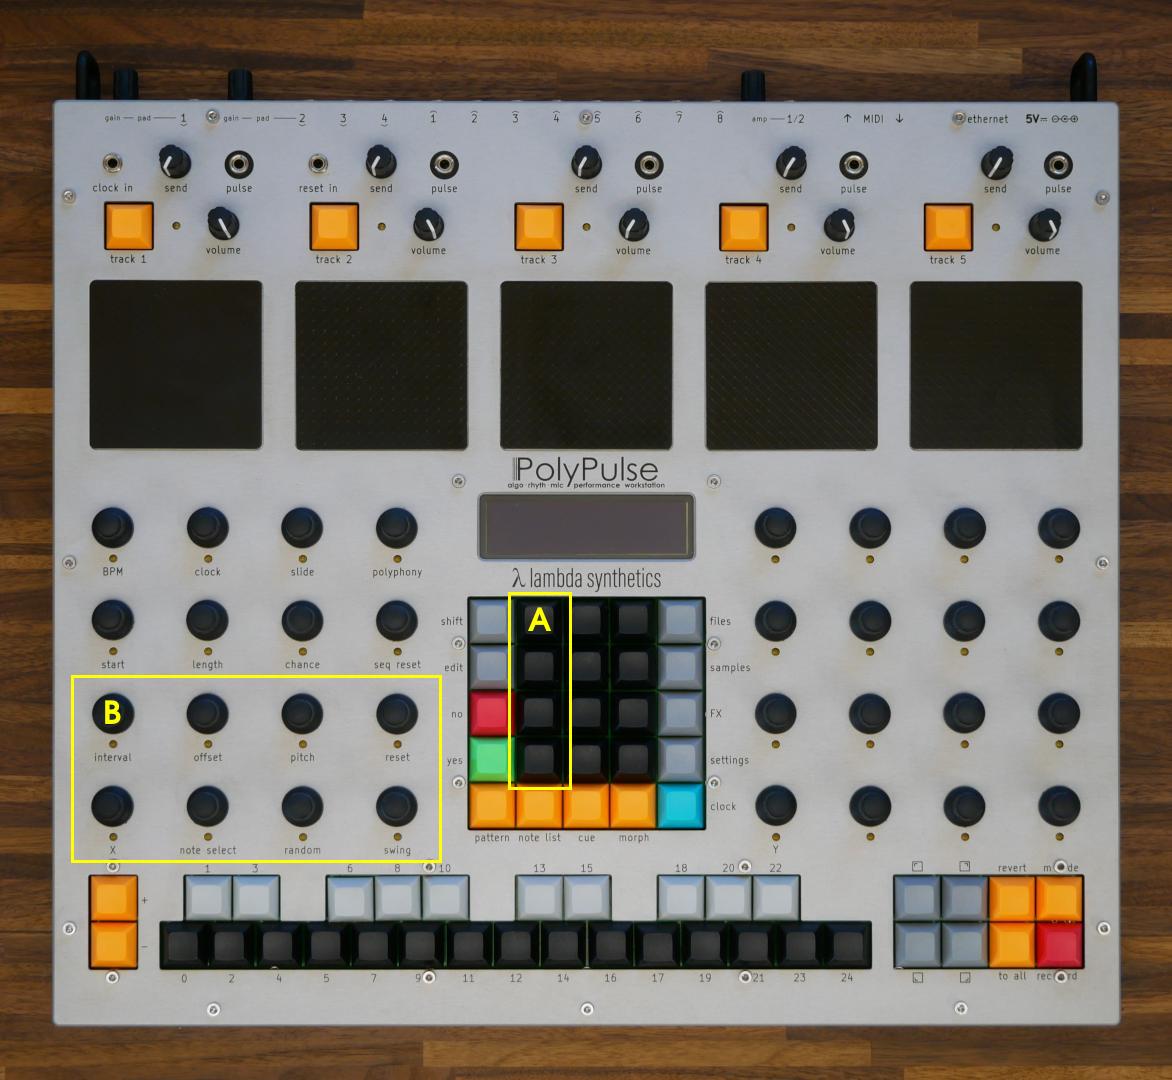
Each track has a poly pulse sequencer with four pulses which can be individually enabled/disabled with the numpad buttons in [A]. Use X to select which pulse is controlled with the encoders in [B].
Note
The enable/disable keys are arranged in a vertical manner to align with the pulses as seen on the display.
shift |
pulse_1 |
- |
- |
files |
edit |
pulse_2 |
- |
- |
samples |
no |
pulse_3 |
- |
- |
FX |
yes |
pulse_4 |
- |
- |
settings |
pattern |
note_list |
cue |
morph |
clock |
When a pulse is enabled, the pulse grid ticks and parameters are highlighted. Notes that are actually triggered are also highlighted and notes that did not trigger (due to the pulse not being enabled, chance or low polyphony) are drawn darker but still visible.

Creating a rhythm
By default the clock mult is set to 8: in each main clock beat the sequencer will have 8 ticks. We enable pulse 1 and set its interval to 6. This will create the following rhythm where a 0 represents a note being played.
main clock:  |       |       |       |
pulse 1:     0-----0-----0-----0-----0-----0-   etc..
Now we add another pulse by enabling pulse 2 using the numpad and set its interval to 8. Pulse 2 will play what is called a quarter note in conventional Western music theory. The resulting rhythm is:
main clock:  |       |       |       |
pulse 1:     0-----0-----0-----0-----0-----0-   etc..
pulse 2:     0-------0-------0-------0-------
Let’s make the first pulse a bit more interesting by setting its reset to 10. After 10 ticks, pulse 1 will reset its counter and start again from there:
main clock:  |       |       |       |
pulse 1:     0-----0---0-----0---0-----0---0-   etc..
pulse 2:     0-------0-------0-------0-------
Apart from resetting single pulses we can also reset the sequencer using reset seq. Let’s set it to 12:
main clock:  |       |       |       |
track reset: |           |           |
pulse 1:     0-----0---0-0-----0---0-0-----0-   etc..
pulse 2:     0-------0---0-------0---0-------
See also
See Note lists for an explanation how poly pulse rhythms are turned into melodies.
Track parameters
Each track has the following parameters.

BPM sets the tempo of the main clock. This parameter is shared with all tracks. When an external clock source is used (for example: MIDI) the BPM cannot be adjusted by the user as it is continuously adjusted to match the external clock source. The LED below the BPM encoder will blink on the beat while the clock is running.
clock mult sets into how many sequencer ticks one beat is divided and can be used to speed up or slow down a track independently of other tracks.
Tip
By setting clock mult to different values on two tracks you can create poly tempo music. The actual BPM per track can be calculated using BPM * (clock mult / 8) = actual BPM.
slide sets the approximate time it takes for the previous pitch to slide to the new pitch when a ‘slide’ note is triggered. Unlike other sequencing parameters listed here slide is not a pattern parameter but is stored in Morphing presets.
polyphony sets how many synthesis voices this track can use. When more notes are triggered in the sequencer than the synthesizers polyphony allows, the notes in the upper pulse rows will be prioritized over pulse rows.
Tip
As synthesis voices are the biggest consumers of processing power, lowering the polyphony value is the easiest way to reduce CPU usage when needed.
start sets after how many sequencer ticks notes start playing after a track reset.
length sets for how many sequencer ticks notes are played after start.
chance sets the chance that notes are played.
Note
The track chance parameter is added to the chance value which is set per note in the note list editor. When all notes are set to 100% setting chance to a negative value will lower the chance of notes playing. Setting chance to positive values when all notes are already set to 100% in the note list editor has no effect. See also Note lists.
seq reset sets after how many sequencer ticks the track resets and all pulses start over again.
In the track settings (edit+track) additional settings can be found:
reset by can be used to have the current track reset when another track resets.
slide all notes converts all triggered notes to note slides. See Note lists.
chord mode sets if and how chords are played. See Note lists.
swing ticks sets the number of ticks over which swing is applied.
Note
By default swing ticks is set to 4. This means that when swing is enabled every 1st, 2nd and 3rd tick is delayed a bit (depending on swing) to move the ticks closer to the 4th tick. Because swing ticks can be set to any value in between 2 and 64, and each pulse can have a different swing amount complex rhythms can be created.
Patterns
A pattern is a combination of sequencer parameter values that determines what rhythmical patterns are generated by the algorithmic sequencer. On each track there are 25 pattern slots which you can access using pattern+#, where # is a key on the keyboard.
While holding down pattern a visualization is shown with squares representing patterns and their corresponding button. The highlighted white square is the currently selected pattern and filled gray square are patterns with at least one pulse enabled:

Press pattern+# to switch to pattern # for this track.
Press shift+pattern+# to switch to pattern # for all tracks.
Press edit+pattern+# to copy the current pattern to pattern # and then switch to pattern #.
In the track settings (edit+track) you can find the following parameters that affect pattern switching:
slot switching sets when a pattern switch is applied: directly, on the start of the next beat (so it is synced to the main clock) or when a sequencer reset occurs.
reset on switch triggers a track reset when the pattern is changed.
shift+pattern+# sets if this tracks pattern is changed when pressing shift+pattern+#.
Tip
Switching patterns, note lists, cues and morphing motion records can happen simultaneously. For example: by holding down pattern+notelist and then pressing # will switch both the pattern and note list to #.